

As the warm weather rolls in, so do the uninvited guests of the season – mosquitoes. If you’re tired of incessant buzzing and itchy bites spoiling your serene evenings outdoors, there’s a fragrant and aesthetically pleasing solution: Citronella candles. Not only do these candles create a calming ambiance, but the citronella oil they contain is also a natural deterrent for mosquitoes.
Perhaps you’ve seen citronella candles in stores or online, but did you know you can create your own right at home? With a few simple materials and a dash of creativity, you can craft custom candles that keep bugs at bay while adding a personal touch to your outdoor space.
In this article, we will guide you through an easy, step-by-step process to make your own citronella candles. From choosing the right wax and wicks to safely incorporating citronella oil, we’ll illuminate every aspect of this DIY project. Whether you’re a candle-making novice or a seasoned pro, you’re just seven steps away from mosquito-free, leisurely summer nights. Let’s get started!
Do citronella candles really work?
Citronella candles are widely used as an insect repellent and can effectively reduce the number of mosquitoes and other biting insects in a given area.
However, the effectiveness of citronella candles may vary depending on factors such as the strength of the wind and the proximity of the candles to the person being protected.
Some research has shown that citronella candles can provide some protection from mosquitoes, especially when used in conjunction with other insect repellent methods, such as insecticide-treated clothing or the use of an electronic insect repellent.
It’s important to remember that citronella candles are not a guaranteed solution to all insect problems, and their effectiveness can depend on many factors.
It may be best to use citronella candles as part of an overall insect repellent strategy rather than relying on them as the sole means of protection.
A step-by-step guide to making citronella candles
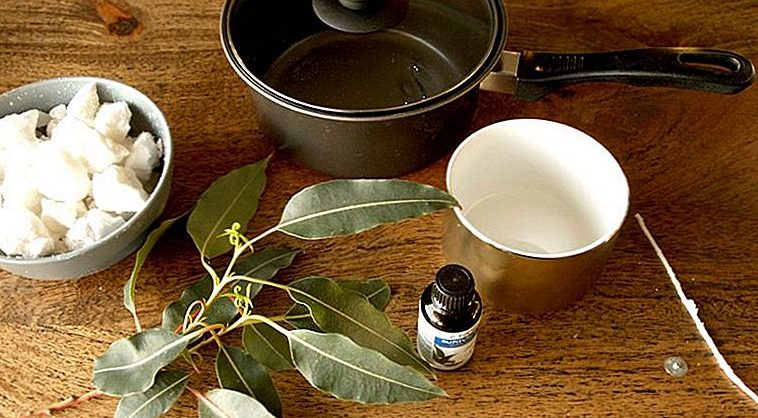
Materials
- Double boiler or a wax melter and metal mixing bowl
- Scissors
- Mason jars (instead of mason jars, you can also use candle tins if available and if more convenient)
- Sturdy tape or hot glue
- Wax (paraffin, soy, or beeswax)
- Citronella oil (look for essential oil for candle making; use one oz. per lb. of wax)
- Pre-made wicks
Instructions
- Prepare the wax: Choose the type of wax you prefer, such as paraffin, soy, or beeswax. Cut the wax into small, manageable pieces and place in a double boiler or heat-resistant container in a saucepan of simmering water.
- Add essential oil: Once the wax is melted, add 20-30 drops of citronella essential oil per pound of wax. Stir the mixture to ensure that the oil is fully incorporated into the wax.
- Prepare the wicks: While the wax is melting, prepare the wicks. Cut the wicks to the appropriate length for your molds or containers, leaving extra length for trimming later. Dip the wicks into the melted wax and place them in the center of each mold or container.
- Pour the wax: Once the wicks are in place, slowly pour the melted wax mixture into the molds or containers, making sure the wicks remain centered.
- Secure the wicks: Use a wooden skewer or chopstick to keep the wicks in place until the wax has hardened. This will ensure that the wicks stay centered and upright as the candles cool.
- Allow to cool: Leave the candles to cool and solidify for several hours or overnight.
- Trim the wicks: Once the candles have cooled, remove them from the molds and trim the wicks to 1/4 inch. This will help to prevent the candles from smoking and make them easier to light.
- Enjoy: Your homemade citronella candles are now ready to use. Light them and enjoy the outdoors, free from pesky insects and with the pleasant scent of citronella.
Note: Always take safety precautions when making candles, such as wearing gloves, keeping flammable materials away from heat sources, and making sure the candles are in a stable and secure place before lighting them.
Conclusion
I hope this tutorial makes it easy for you to make your citronella candles! Thank you for taking the time to watch this video. We hope you enjoyed this video.
Customer feedback has always helped us improve. We’d love to hear your thoughts, and we’re sure other viewers would as well. Writing a review is easy, fast, and fun.
If you like our guide or video, please rate it and share it with your friends, family, and colleagues. We will be very grateful. Please use the social media buttons at the bottom of the page.
Frequently Asked Questions (FAQs)
What is citronella?
Citronella is a type of grass known for its strong, fresh aroma. Oil derived from citronella is often used in insect-repelling products, including candles, because mosquitoes and certain other insects dislike its scent.
What type of wax should I use to make citronella candles?
You can use various types of wax to make citronella candles, including soy wax, paraffin wax, or beeswax. Soy wax is often preferred for its clean burn and the fact that it’s a renewable resource.
What are citronella candles made of?
A: Citronella candles are typically made of wax, such as paraffin, soy, or beeswax, infused with citronella essential oil. The essential oil is derived from the leaves of the citronella plant, which is native to tropical Asia.
How much citronella oil do I need for my candles?
As a general rule, you should use about 1 ounce of citronella oil per pound of wax. This may vary slightly depending on the wax type and your personal preference for scent strength.
How long will my homemade citronella candles last?
The burn time of your candle depends on its size and the type of wax used. As a rough guide, a medium-sized soy wax candle can burn for 30 to 40 hours. Always remember to extinguish candles when they reach about half an inch from the bottom of the container.
Can I use citronella candles indoors?
While it’s safe to burn citronella candles indoors, they’re typically used outside where mosquitoes are more prevalent. If using indoors, make sure the area is well-ventilated as the scent of citronella can be quite strong.
What is the shelf life of citronella candles?
The shelf life of citronella candles can vary depending on factors such as the type of wax used and the storage conditions. Paraffin wax candles have a shelf life of about one year, soy wax candles have a shelf life of about two years, and beeswax candles can last up to five years or more.
Are citronella candles safe to use?
Citronella candles are generally considered safe to use. However, it is important to follow safety precautions, such as keeping the candles away from flammable materials and making sure they are in a stable and secure place before lighting them.
In addition, people with allergies or sensitivities to certain fragrances or essential oils should use caution when using citronella candles.
What are the benefits of using citronella candles?
It provides the benefits of insect control and a pleasant, fresh scent. They can be used outdoors to reduce the number of mosquitoes and other biting insects and are a popular choice for outdoor dining, camping and gardening.
In addition to their insect repellent properties, citronella candles can also be used for their pleasant scent even when insects are not a concern.
Are homemade citronella candles as effective as store-bought ones?
he effectiveness of a citronella candle largely depends on the amount of citronella oil used. If you follow the recommended amount, your homemade candles should be just as effective as store-bought ones in repelling mosquitoes.
Carole Brooks has been making candles for many years. She loves to create candles of all different types and for all different purposes. Here she shares her experience and knowledge. Carole is a graduate of Texas A&M University.
")
")
")
")